

Since moving into the house we have had our mattress and box spring on the floor. We have a metal bed frame but because of the sloped ceilings it was too tall to use. I love upholstered beds but had no desire to pay retail and after stumbling upon Ana White's website I no longer need to. She has given us the courage and skills to build a lot of our own furniture.
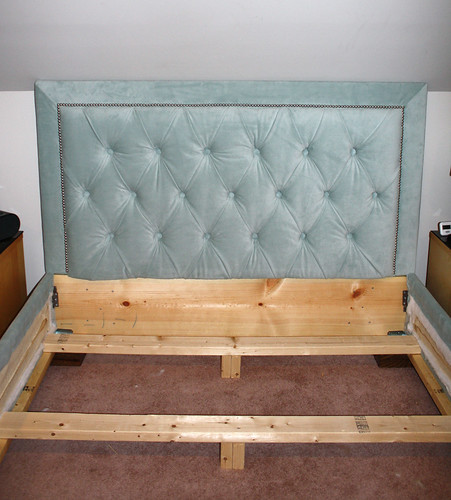
I used her chunky leg bed frame plan with a few modifications to make an upholstered bed frame inspired by West Elm's Nailhead Bed Frame.

I wanted the bed to be easy to disassemble and move. For that reason I used corner supports from Home Depot and Bed Rail Fasteners to hold the sides together. I also upholstered each board separately instead of building the box and then upholstering like I have seen some other people do.
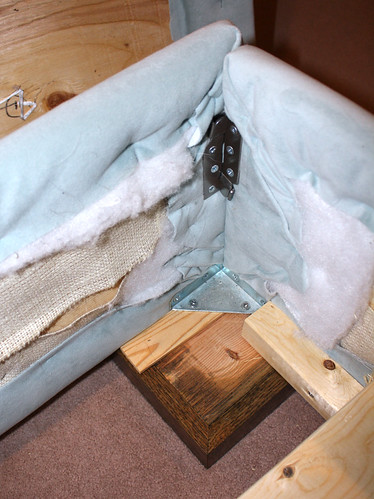
We did not use a center support and slats because we needed room for the box spring. Instead we screwed a 2x2 to the bottom of each side of the bed and used 2x4's supported in the center to hold the weight of the boxspring and mattress.
More on the headboard in a future post.
****************************************
I’m sharing this post at:
Handy Man Crafty Woman
Someday Crafts
Creations by Kara
Remodelaholic's Anonymous
Primitive and Proper – Piece of Work Wednesday
Primp Your Stuff Wednesday
Savvy Southern Style – Wow Us Wednesday
Polly Want a Crafter
Craft-o-Maniac
Hookin Up With HOH
I’m sharing this post at:
Handy Man Crafty Woman
Someday Crafts
Creations by Kara
Remodelaholic's Anonymous
Primitive and Proper – Piece of Work Wednesday
Primp Your Stuff Wednesday
Savvy Southern Style – Wow Us Wednesday
Polly Want a Crafter
Craft-o-Maniac
Hookin Up With HOH
This project was featured on Remodelaholic
Pin It
Came over from the Handy Man Craft Woman site - Great job on the headboard! I love Ana White site!
ReplyDeleteoh my LORD is that gorgeous!!!!! WOW! i love the glamorous look and the color!
ReplyDeletehow did you attach the headboard to the rest of the bed frame? I can't tell from the picture. Thanks!
ReplyDeleteGorgeous!! What is the length of the screwed you used for the bedrail fasteners and the corner supports?
ReplyDeletemeredith521: There are two legs behind the headboard/bed that both are screwed in to. The headboard could also be mounted to the wall using flush mounts. (http://media.photobucket.com/image/french%20cleat/MississippiMan/Business%20Photos%20to%20send/FrenchCleatScreenHangingmethod.jpg)
ReplyDeleteJackie Kwan: The bed rail fasteners call for six #8 screws.
Your bed and bedding are gorgeous. Your work is so good that the bed looks like a high-end purchase. I just saw it on REMODELaholic and was impressed. Appreciate the detail on the bedframe build as it will help me with my bed project. I would love to know about the bedding if you do not mind - would like to turn the pillow sham/case into a picture for my bedroom as the colors are perfect. Thank you for sharing your work!
ReplyDeletecritterrich thanks so much. I bought the bedding from Home Goods, don't remember the brand. I did see something similar at Bed Bath and Beyond awhile ago, google Anthology Daintree. Maybe you could buy it on ebay?
ReplyDeleteBeautiful and I want one just like it! One question though, how did you calculate the amount of fabric needed?
ReplyDeleteFigure how much fabric you would need if you were making a plain non tufted headboard. Then for every button add inches depending on the depth of your foam. For example I used 2" foam, so you have to add 4" of fabric for every tuft. See the diagram here: or this video for further clarification.
Delete