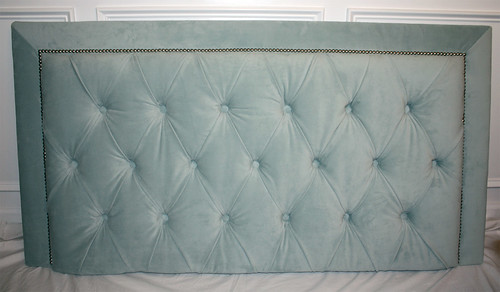
Friday, April 13, 2012
Thursday, January 12, 2012
Thursday, January 5, 2012
DIY Diamond Tufted Headboard with Nailhead Trim
In my last post we talked about my DIY bed frame. No bed frame is complete without a matching headboard so I had to say goodbye to the old and create a new one.

1. Sanctuary Bed, High Fashion Home 2. Madison Bed, High Fashion Home 3. Woodhouse Bed, Jonathan Adler
I love all three of these beds and their arched headboards. Unfortunately none of these shapes would work with our slanted cape ceilings so I had to settle for a rectangle. This was my inspiration.

Source: Heller Furniture

I used 2" foam and two layers of batting, one high loft the other I just had laying around. You don't want foam where your nailheads are going to be, so you need to round the foam over for a softer transition. Basically you just staple the edge down along the line of the shape you are making. See this video for a better idea of what I'm talking about.

This is a queen size headboard. The border is 4" wide and my holes are 7 3/4" apart. Initially we cut out holes that were pretty much the same size as the buttons. Later we had to go back and make them a little larger.
My fabric is a faux suede and on the thick side. Instead of trying to cover my own buttons I took my fabric to an upholstery shop and had 20 buttons made for only $10.Tutorials used to complete headboard:
GACMKC on youtube - the headboard they end up making is dated, but I picked up a lot of good ideas
Diamond Tufted Headboard at Addicted to Decorating
Diamond Tufted Headboard Part Two and Three at Brick City Love
Pin It
Friday, December 30, 2011
DIY Nailhead Chunky Leg Bed Frame
Since moving into the house we have had our mattress and box spring on the floor. We have a metal bed frame but because of the sloped ceilings it was too tall to use. I love upholstered beds but had no desire to pay retail and after stumbling upon Ana White's website I no longer need to. She has given us the courage and skills to build a lot of our own furniture.
I used her chunky leg bed frame plan with a few modifications to make an upholstered bed frame inspired by West Elm's Nailhead Bed Frame.

I wanted the bed to be easy to disassemble and move. For that reason I used corner supports from Home Depot and Bed Rail Fasteners to hold the sides together. I also upholstered each board separately instead of building the box and then upholstering like I have seen some other people do.
We did not use a center support and slats because we needed room for the box spring. Instead we screwed a 2x2 to the bottom of each side of the bed and used 2x4's supported in the center to hold the weight of the boxspring and mattress.
More on the headboard in a future post.
I’m sharing this post at:
Handy Man Crafty Woman
Someday Crafts
Creations by Kara
Remodelaholic's Anonymous
Primitive and Proper – Piece of Work Wednesday
Primp Your Stuff Wednesday
Savvy Southern Style – Wow Us Wednesday
Polly Want a Crafter
Craft-o-Maniac
Hookin Up With HOH
This project was featured on Remodelaholic
Pin It
Wednesday, December 21, 2011
Sad News
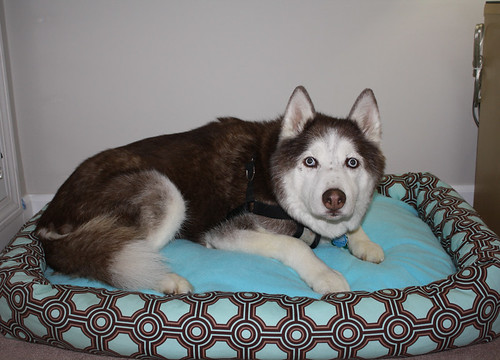
I'll never understand why man's best friend has such a short life span. We adopted Saber 2 1/2 years ago from animal control and he crossed over to the rainbow bridge today. He hadn't been eating and results of a blood test showed that his bone marrow was no longer creating enough platelets and red and white blood cells. We weren't able to find any definite cause before he passed. He was my snuggle buddy. a companion to our other husky and just the best. I didn't have nearly enough time with him and he will be missed.
Monday, September 5, 2011
Dog Bed II
You may remember the giant dog bed that I made for the huskies. Even though it took a long time to make, they didn't use it at all (I don't blame them, it was kind of hard) and it seemed silly to leave it taking up all that space. So I tore apart all my hard work and made a new smaller bolster bed.
I'm happy to report that at bedtime Sabe goes straight to his new bed.
I really couldn't even begin to create a tutorial on how I made this, it was a lot of trial and error. And if I were to make another I would do it completely differently. If you are interested in making one for your dog check ebay for McCalls Easy Stitch n Save pattern #5506. It's an older discontinued pattern but it's very similar.
Pin It
Monday, June 6, 2011
Orange buffet

Thursday, March 24, 2011
The House: Bathroom
This is the bathroom before. There was barely any space between the sink and toilet and you ended up touching the toilet when getting out of the shower (*shudder*). There was blue and pink tile on the floor and what looks like tile on the wall is actually some sort of fake tile board.
The chimney is between the bathroom and kitchen wall making for an awkwardly spaced bathroom. We bumped into the hall linen closet to create an actual space for the vanity and some much needed breathing room between the toilet and sink. I'm planning on painting all of the doors white and rehabbing the glass knobs, but haven't gotten around to that yet.
My favorite part of the new bathroom is this fabulous sink from overstock.com. I wanted a vessel sink but nothing too modern and I think this works perfectly. Instead of buying a vanity we used unfinished stock cabinetry and stained them a nice dark ebony color. Since opening up the bathroom resulted in losing the linen closet we added a matching pantry cabinet. The countertop was created from smaller tiles that match the floor. And since I couldn't find an oil rubbed bronze light fixture that I liked I spraypainted a brushed nickel one.
Here is the new floor tile.
I used this idea from young house love to make the ceiling look higher and hopefully keep more steam in the shower (I hate a cold shower). The only problem is finding a reasonably priced, appropriately sized, non-boring shower curtain that is 96" long. I have only found a few and nothing to my liking. As a result, sometime in the future, you will see a shower curtain tutorial.
Monday, March 7, 2011
The House: Dining Room
This house was listed as a 4 bedroom, which just doesn't seem appropriate for the square footage. This house is only around 1100 SF with one bathroom. To say that it has 4 bedrooms just doesn't make proper use of the space. I guess you could put a table in the kitchen (the previous owner had a small round one) but it would be right in your path to get to the rest of the house. So the 4th bedroom has become the dining room.
This is how it looked before.Here is the after. I'll have to take some better pictures but for now this is what I have. We replaced the ugly, non-working fan with a new chandelier and created wainscoting panels made from base cap molding.


