
In my last post we talked about my DIY bed frame. No bed frame is complete without a matching headboard so I had to say goodbye to the old and create a new one.

1. Sanctuary Bed, High Fashion Home 2. Madison Bed, High Fashion Home 3. Woodhouse Bed, Jonathan Adler
I love all three of these beds and their arched headboards. Unfortunately none of these shapes would work with our slanted cape ceilings so I had to settle for a rectangle. This was my inspiration.

Source: Heller Furniture
I'm not going to create a tutorial because I can point you to other blogs for that, but I will include a few tips and progress pictures. I strongly recommend that you do not attempt this project without an air or electric powered stapler. There is just way too much stapling involved to use a manual one.

I used 2" foam and two layers of batting, one high loft the other I just had laying around. You don't want foam where your nailheads are going to be, so you need to round the foam over for a softer transition. Basically you just staple the edge down along the line of the shape you are making. See this video for a better idea of what I'm talking about.

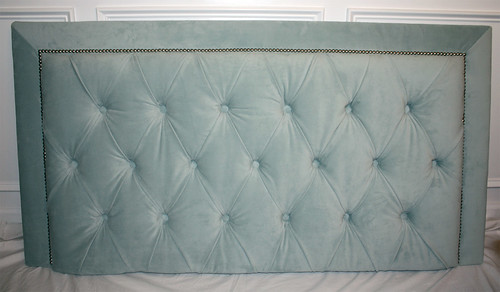
This is a queen size headboard. The border is 4" wide and my holes are 7 3/4" apart. Initially we cut out holes that were pretty much the same size as the buttons. Later we had to go back and make them a little larger.
 My fabric is a faux suede and on the thick side. Instead of trying to cover my own buttons I took my fabric to an upholstery shop and had 20 buttons made for only $10.
Tutorials used to complete headboard:
GACMKC on youtube - the headboard they end up making is dated, but I picked up a lot of good ideas
Diamond Tufted Headboard at Addicted to Decorating
Diamond Tufted Headboard Part Two and Three at Brick City Love
Pin It
Your headboard is beautiful! You did a fantastic job on it. Thanks for the linky love! :)
ReplyDeleteGreat job! Hope you found the tutorials helpful.
ReplyDeleteIs the border fabric a separate piece of fabric from the tufted section? Making a similar headboard (tufted center with nailhead trim) but with a slightly different shape from yours at the top. I have studied this for some time and this was my last real question...then it's time to get in their and just do it! Thanks!
ReplyDeleteYes it is a separate piece. I did the tufted part, then cut off the excess fabric, cut three strips for the edge and I mitred the corners with my sewing machine. Most likely you could achieve the same effect with folding the fabric.
ReplyDeleteCan you kindly post pictures of doing the border pieces and the nail head trim for better understanding? I am trying to make a similar one but I am getting lost in understanding how to do the edges that are non tufted.
ReplyDeletethanks!
Hi there,
ReplyDeleteI just wanted to let you know that I featured your headboard in a blog post of my favorite DIY headboards at this link: http://www.lilikoijoy.com/2013/04/15-favorite-diy-upholstered-headboards.html
Thank you for inspiring me! Sharon
Love your blog great projects. Thanks so much for visiting my blog and to answer ur question the filling cabinets are 28 inches high. your newest follower can't wait to see what you post next.
ReplyDeleteDesiree @ YourCraftyFriend
I think your version is better than any I have seen in expensive catalogs! I HAVE to try to copy you. I have been studying your plans for a while now and am ready to purchase supplies, but I have some questions I hope you don't mind answering:
ReplyDelete1) How much fabric did you use?
2) How did you upholster the edges of the headboard vs the trim? I assume the nail heads were last? I know you sort of already answered this above, but I was wondering if you stapled the fabric down then nailed and if that caused trouble with the nail heads? I just can't seem to imagine this step for some reason.
3) How did you attach the headboard to the frame?
THANK YOU a MILLION times for making this and sharing it!
Tamara
Hi Tamara thanks so much for the compliment. I don't see a way to email you so I'm replying here. You should definitely check out the tutorials I posted because they were very helpful to me. Here is another headboard i made if you want to check it out.
ReplyDelete1. For my headboard I think I used about 3 yards.
2. My nailheads are individually set, some people use nailhead trim but I don't have any experience with that so I can't comment as to how that works. Yes the nailheads were the last step. The border is a separate piece of fabric from the middle part. I stapled really close to the edge of the phone. Because the nailheads are sort of like tacks the edges cover the stapled seam but the tack part isn't hindered by the staples if that makes sense.
3. You can hang the headboard to the wall with a french cleat. Or you can make legs out of 2x4's and screw it into the bedframe.
I would love to see your finished product.
Hi there! I was hoping you could give me some advice. I'm planning to make a tufted velvet headboard, but velvet comes in so many different thicknesses. Do you think it's easier to go on the thicker side, or the thinner? I'm just concerned about how easy it will be to make the folds with a super-thick fabric.
ReplyDeleteSorry for the late response, I missed this comment. It's easier to work with thinner fabric, but you also want something that will be durable. So perhaps something in the middle?
DeleteGreat job on this project! After looking at hundreds of different diy headboards I keep coming back to this one. I'm drawn to the diamond pattern you used. Do you remember the height and width of your diamonds? I saw that you said each button was spaced 7.75 inches apart. Does that mean the diamonds are 15.5 x 15.5 inches?
ReplyDeleteFor my bed frame I upholstered each board separately, as you did. I just used one layer of hi loft batting, then muslin and fabric. I'm worried I'll run into trouble when it comes time to put in the upholstery tacks. How did you go about applying them to the bed frame? Thank you!
The diamonds are longer than they are wide. So between buttons it's about 7 3/4" but the actual diamond is about 14" high. You can also make them square but that requires more buttons and more fabric.
DeleteSetting individual nailheads is not an easy task and to be honest my boyfriend is way better at it so I had him do it. You can buy nailhead trim where the nails are all connected and you only put in a nail every few spaces but personally I don't like the way that looks. Also I have seen instances where the separate nails and the trim are different colors and it looks even worse. You might find something like this helpful, it helps with spacing but not getting them to go in a straight line. Good luck and I'd love to see how it turns out.
What is the name of the fabric you used?
ReplyDeleteIt's a thicker faux suede fabric, the color is called pool. Not sure of the manufacturer but considering I bought it in 2011 I doubt it's still being sold.
Delete