
Fabric
Muslin (for lining)
Curtain grommets
4" Drapery header tape
Tools
Sewing machine
Blind hem foot (optional)
Thread that closely matches your fabric
Measuring tape
Sewing gauge
Cutting mat
Acrylic ruler
Rotary cutter
Step 1:
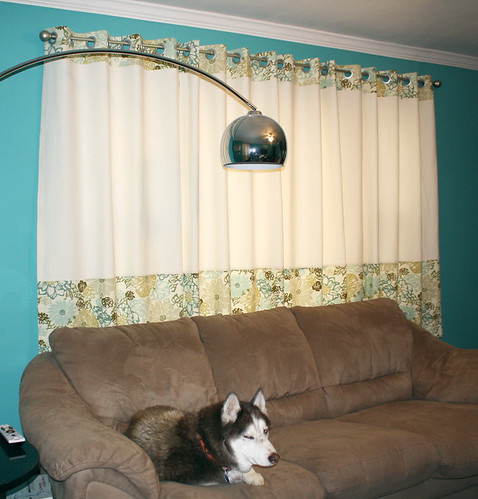
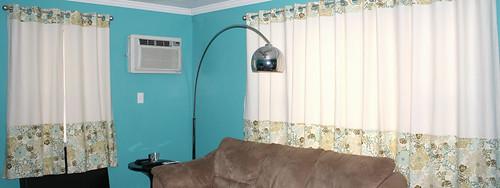
Install your curtain rod. Install the brackets so that the rod will sit 4" above the window frame, and extend 4" beyond the edge of each side of the window.
Step 2:
Measure from the rod to where the you would like the bottom of your curtains to end. Typical lengths are 63", 84" and 95". Whatever you determine will be your finished length.
Step 3:
Measure the length of your curtain rod. For grommet curtains you want panels that are at least double the length of your rod. Most likely you will be using the full width of your fabric, which is typically 44-45". From there you need to determine how many panels are needed for one window.
Step 4:
Cut your fabric and lining. (Make sure to wash, dry and trim selvages before cutting).
All measurements include a .5" seam.
Fabric width: Full width of fabric [If curtains are smaller than the full width, the calculation is finished width + 4"]
Fabric length: Finished length + 8" (hem) + .5" (top hem)
Lining width: Fabric width - 3"
Lining length: Finished length - 3"
Step 5:
Using a zig zag stich finish off the top and bottom of fabric.

Sew in the bottom hems.
With your fabric laying right side down, fold up the bottom 4" and press. Then fold up another 4" and press. Pin your hem. Sew with a blind hem stitch. A straight stitch can also be used but a blind hem looks more professional.

With your lining laying right side down, fold up 1" and press. Then fold up another 1" and press. Pin again and sew in place with a blind hem or straight stitch.
 Step 7:
 Press in your top hem.
With your fabric laying right side down, fold the top over a half inch and press.
 Step 8:
 Sew your lining and fabric together.
Put your fabric and lining right sides together. The lining should be 3.5" from the top and about 1.5" from the bottom. (We don't want the lining running all the way to the top because we need to minimize bulk for the grommets.) Align on one side, pin and sew together with a .5" seam. Pull lining over to the other side of the fabric and repeat.
 Step 9:
Turn curtain right side out. Your fabric will automatically turn over to the lining side about 1.5". Iron the curtain so that the fabric is even on both sides of the lining and pin to prevent slipping.
 Step 10:
Fold in the raw edges on bottom, press and pin.

Step 10:
Cut a piece of drapery header a little smaller than the width of your finished curtain. Smooth out the lining fabric and pin the header onto the top of the fabric and lining.

Step 11:
Sew the header down with two rows of horizontal stitching.

Step 12:
Sew down each side of the curtain with a straight stitch making sure to catch the lining.
 Step 13:
You must use an even number of grommets or else you won't be able to hang your curtains properly. The typical spacing between grommets is 4.5", but that isn't a hard and fast rule.
You will receive a template with each package of grommets. Place the template inside of your stitching and about 1" from the top of your panel. This is where you should mark for your first grommet.

Step 14:
Make sure the spacing between each of your grommets is even. Determine the appropriate spacing and mark where you will place the grommets.. As you see in the picture my spacing was 5". So I marked a hole every 5".

Step 15:
Cut an X inside of each hole with your rotary cutter and then cut out the circle completely with scissors.
Step 16:
Insert your grommets.
ALL FINISHED!
*****
I’m sharing this post at: Remodelaholic * Freckled Laundry
Pin It
Beautiful! Thank you for sharing the how-to...Anyway, I like the wall color.
ReplyDeleteThank you. The wall color is actually nicer in person, it got a little washed out with the flash. The color is Teal Zeal by Behr.
ReplyDeleteBeautiful drapes and the tutorial is wonderful! Thank you so much for sharing with air your Laundry Friday, sweetie!
ReplyDeleteJami
Thank you for sharing your remarkable talent!
ReplyDeleteGreat tutorial! This is so helpful. I have a new drapery workroom and I am going to use these instructions to make my client's grommet top drapes. I'm assuming you used the type of grommets that you can just snap closed. I now need to figure out what sized grommets I need to get. Thanks so much! Susan
ReplyDeleteIs there a specific reason why you didn't finish the raw edges of the fabric at the sides of the curtain?
ReplyDeleteSusan, yes I did use the snap on grommets you buy at JoAnn's
ReplyDeletecloudsonvenus, I'm not sure what you mean...if you are asking why I didn't zig zag the sides in step 5, it's because they get sewn when you sew the fabric to the lining.
I've been looking for an easy-to-follow guide for making lined grommet curtains, and this is clear and makes a lot of sense. I now feel confident to tackle my new living room curtains. Thank you so much!
ReplyDeleteThank you for the tutorial. I am a bit confused though, about the cutting length of the fabric and lining fabric. I want my curtains to be 86" finished, so I am planning on cutting them 94.5", and the lining 3" less, so 91". But if I put in a 4" hem in the fabric and only a 1" hem in the lining, then my fabric will be 86" long and my lining will be 89" when it needs to be shorter than my fabric. I have read through the instructions like 5 times and I am still confused. What am I missing??
ReplyDeleteLooks like I goofed up. Instead of fabric length it should say finished length. If you are using very thin muslin for your lining it probably won't add that much bulk and you can just cut it to 86" and the hem will make it 84".
ReplyDeleteThank you! That makes sense. I was beginning to worry that I was missing some major step somewhere, haha. Glad to know I am not going crazy! Thanks for the help.
ReplyDeleteGreat tutorial.....Is the header tape showing on the back after inserting grommets? The plastic grommets I have will not hold 2 thicknesses of material and the header tape. I can't find metal grommets in small quantities. Do you know where I might find 25 metal ones that are 1 9/16" ? Thanks
ReplyDeleteThe header tape does show, it is sewn to the muslin and top hem. My grommets are plastic and I bought them at JoAnn's. Actual metal grommets require a grommet press. You might want to call around to upholsterers, they can possibly install them for you.
ReplyDeleteI like how you used two fabrics on your panels. How much extra fabric did you allow for the seams?
ReplyDeleteFor almost everything I sew I use 1/2" seams. The top and bottom panel would require an extra 1/2" and the middle an extra inch. (I think it's been awhile since I made these)
ReplyDeleteThanks so much for sharing this tutorial. I'm in the middle of deconstructing a ready made curtain panel to recreate a grommet valance. I just wanted to verify the type of drapery header you use here. My local stores only carry two kinds, the very light non-woven, and the very heavy pleated headers. Did you use the lighter one or find your online or at a specialty store? Thanks!
ReplyDeleteI bought my drapery tape at JoAnn's. google Wright's Drapery Header Tape or here is the link.
ReplyDeleteThanks for this tutorial! Quick question about step 8. Can you clarify the instruction at the end of Step 8: "Pull lining over to the other side of the fabric and repeat." I can't quite visualize what this means. Is the lining sewed to both sides of the main fabric?
ReplyDeleteYour lining fabric will be smaller in width than your main fabric. Once you sew the lining to one side you will then have to pull it over to the other side (because it is smaller) to sew it to that side. Yes, it is sewn on both sides.
Delete