Pages

Showing posts with label furniture. Show all posts

DIY Diamond Tufted Headboard with Nailhead Trim

05 January 2012

DIY Headboard

In my last post we talked about my DIY bed frame. No bed frame is complete without a matching headboard so I had to say goodbye to the old and create a new one.

DIY Nailhead Chunky Leg Bed Frame

30 December 2011

DIY Upholstered Nailhead Bed Frame

Since moving into the house we have had our mattress and box spring on the floor. We have a metal bed frame but because of the sloped ceilings it was too tall to use. I love upholstered beds but had no desire to pay retail and after stumbling upon Ana White's website I no longer need to. She has given us the courage and skills to build a lot of our own furniture.

Orange buffet

06 June 2011


I stumbled upon this fantastic orange dresser/buffet and had to share. Available at Live.Like.You for $998.

Daybed Chair

08 September 2010


While browsing the internet for the perfect daybed I came across this beauty. Not exactly the kind of daybed I was browsing for but I'll take it. It looks incredibly comfortable and is what I've been looking for without even knowing. I'm not sure if you can actually buy it, or if it's just one of those concept pieces. If it is for sale it's probably crazy expensive. But I can dream.

via

Who needs Pottery Barn? Build your own furniture!

02 March 2010

My new favorite blog is Knock off Wood. I stumbled across it yesterday and two hours later found myself still browsing. To say that I was inspired and amazed is a severe understatement. I love to look at furniture from Pottery Barn, West Elm, Restoration Hardware etc... but it is usually way out of my price range. Ana found herself in the same predicament but didn't let it stop her from creating a stylish home by building her own furniture. She takes inspiration from places like Pottery Barn, figures out how to make the piece for a lot cheaper and puts together plans, diagrams and shopping lists that she is generous enough to share for free. All that she asks in return is that you add comments on your building experience to assist others and post finished projects on her bragging board. Thanks Ana!

Update: Ana's site can now be found at ana-white.com

Ebay Finds

10 August 2009

More furniture rehab candidates:

Georgetown Galleries Dresser
Starting bid: $150 Seller: artcollector-usa
Needs a hardware update.

Screens - Pair
Price: $275 Seller: yolandaroe
Use as is or give them a coat of paint.

Dresser
Price: $275 Seller: yolandaroe
Needs a hardware update

Headboard
Starting bid: $80 Seller: artcollector-usa
Needs some paint and an upholstered insert with some nailhead trim.

Mirrors (auction is for one)
Starting bid: $50 Seller: tsandcompany
Needs a coat of paint.

Syroco mirror
Starting bid: $35.99 Seller: calli511
Would probably spraypaint gloss white.

Avington Chair via Target

03 August 2009

I absolutely love slipper chairs and found this cute one at Target the other day. Would you believe it is actually comfortable too? Reviewers are giving it high praise. Price: $159.99

Ebay Finds

Night Stands (auction is for one)
Starting bid: $50 Seller: tsandcompany

Ebay finds

02 August 2009

Walnut dresser
Starting bid: $180 Seller: artcollector-usa

Drexel Dresser
Starting bid: $100 Seller: tsandcompany

Ebay finds

21 July 2009

Dresser
Starting bid: $100 Seller: tsandcompany

Blu Dot & Urban Outfitters = +00

13 July 2009

I'm not exactly on top of things. I just discovered that Blu Dot and Urban Outfitters have teamed up to create a furniture line marketed under the name +00. I'm liking this couch and shelving unit. Wonder what the quality is like?

DIY Saarinen Table

20 May 2009


OMG look at this DIY Saarinen Table posted on Apartment Therapy yesterday. Instructions can be found here. How clever! And so much cheaper than the original. If you are looking for the speaker stands, check ebay. They are from the Bose 901 series.

What a difference a coat of paint makes

02 March 2009

I have needed a side table for quite awhile but never felt like shelling out the cash for one. About a month ago the fates aligned. They were going to throw out this side table at work, so I took it home. It was a hideous thing but I had been dying to spraypaint something and if it turned out badly I would only be out about $10.

It certainly isn't perfect but it looks much nicer and hey, it was free.

If you want to take on your own side table project it was quite simple. Fill in any chips with wood filler. Sand the table. Prime it. Then paint.

Louis Bed

06 February 2009

Isn't this bed gorgeous? It's a perfect mix of modern and baroque. I'm officially obsessed and must own one someday. To see more pictures of this fabulous bed visit NOTCOT.

DIY Tufted Headboard

01 February 2009

DIY Headboard

I love the look of a tufted headboard, but could never bring myself to part with $400+ to buy one. Then I thought, why not make one? The result was a fabulous looking headboard, if I do say so myself. If you have always wanted a headboard and have a free day, a friend to help out and around $100, you too can make your very own headboard. If I can do it, anyone can. Go for it.

DIY Headboard Detail

Supplies:

1/2" Plywood
Foam (at least 2" thick)
Polyester Batting
Upholstery Fabric
Upholstery Thread
Upholstery Needle
Cover Button Tool and Buttons
Scissors
Spray Adhesive

See below for mounting options and supplies needed

Tools:
Staple Gun and 1/2" Staples
Tape measure
Drill
Hammer

Optional but helpful:
Rubber Mallet
Electric Knife

Step 1: Look for inspiration
Headboards can be made in a variety of shapes and sizes, depending on how ambitious you want to be. Since I had never made one before I stuck to your standard rectangle shape. My inspiration was this Nate Berkus headboard.

Step 2: Take Measurements

Width: Measure the width of your bed. The headboard should be a about 1" or 2" larger in width than your mattress.

Height: This is up to you. If you are planning on leaning against it while in bed make sure it is tall enough. Measure from the top of the mattress to the height you want the headboard to be.


Step 3: Buy Your Supplies:
You can buy plywood in large sheets. Have the hardware store cut it to size. (Most stores will do this for free.) The sheet probably won't lay exactly flat, but it isn't a big deal.

You may know of a better source for foam but I bought mine at JoAnn fabrics for 50% off. I had to buy two pieces because their foam only comes in one width and this accounted for about half the money spent on the project.

When buying your batting and fabric, make sure you have enough to wrap around the front and secure to the back. (I wouldn't recommend a patterned fabric for your first try.) Two layers of batting over your foam is recommended.

Step 4: Put It All Together:
1. Find a clean, well ventilated work area.

2. Determine how many buttons you will use and where you want them to go. (Just a heads up the tufting was by far the most time consuming part.) Mark the board and drill small holes. (Just small enough for the upholstery needle to pass through, this will help keep the buttons lined up.)

3. Lay the plywood down and spray one side with adhesive and adhere the foam. Cut off any excess foam so that it is exactly flush with the plywood. There should be no overlap. (This is where that electric knife comes in handy.)

4. Push your upholstery needle through the holes you just drilled the foam. Make shallow cuts into the foam where your upholstery needle comes through.

5. Spray the foam with adhesive and hold one side of the batting while your friend holds the other side and pull taut. Place on top of foam. Make sure there is no puckering because it will show through the fabric. Repeat for second layer of batting.

6. Flip the plywood, foam and batting over and lay it flat on the ground. Wrap the batting around to the backside and staple in place.

7. Lay fabric on the floor wrong side facing up. Place plywood, batting side down on top of fabric. Wrap fabric around to the back of the headboard, secure the fabric loosely with a few staples.

8. Use the button covering kit to cover your buttons. (See this tutorial on youtube for help.) This part is a pain. The smaller the button, the more difficult it is to cover them. (A rubber mallet will be helpful. I ruined my button maker with a hammer.)


9. Double thread your upholstery needle with upholstery thread and poke through one of your pre-drilled holes from the back to the front. Don't pull all the way through! Make sure to leave some thread hanging out of the back. Slide the button onto the thread and poke the needle back through the same hole. Push the button on the front of your headboard into the foam while your friend tightly secures the thread on the back with a bunch of staples. You will need a hammer to bang in the staples, so that the thread will stay secure. (There is probably a better way to secure the thread but this is how I did it.)

10. Continue along and tuft each of your holes.

11. When all the tufting is finished, secure the fabric to the back of the plywood with more staples.

12. Step back and admire your work.

Mounting Options:

There are three ways that I know of to mount your headboard; legs, a french cleat or flush mounts.

Legs are the most apartment friendly method because it doesn't involve drilling holes into the walls. Just make sure that the headboard sits a little above your mattress or else it can interfere when you are trying to make the bed. For this option you will need two 1x4's cut to size. The legs should be about 2" above the floor and within 5" of the top of the headboard. Screw the 1x4's to the back of the headboard and then bolt them onto your bed frame.

A French cleat is a little more involved but this is my favorite method. To use this method take a board and rip it at a 45 degree angle. Then you mount one piece to the back of the headboard and the other to the wall. The headboard sits on the upward facing angle making it very sturdy. You will also need to attach another piece of wood to the bottom of the headboard to keep it level. Hopefully this video and image can help clarify things.

The flush mount method can be found at bejane.com.

Tips:
If you have a Joann Fabrics in the area, this is the place to buy most of your supplies. I was able to get my fabric, foam, and batting for 50% off. Most of the other supplies can be bought with one of their 40% off coupons.

DancingMagpieSupply on Etsy is a great resource for buttons.

For this project I pieced together instructions from a variety of sources online, mainly bejane and joann fabrics.

*****
I’m sharing this post at: Remodelaholic * Finding Fabulous * Miss Mustard Seed


This project was featured at:


&

Apartment Therapy


&

So Very Creative


Pin It

Ebay finds

29 January 2009

Set of 6 Panton chairs (original from 1960)
Seller: artcollector-usa Starting bid: $900

These chairs would easily run you $1600 in the store and the best part...they're orange!

Decorative Twin Headboard
Seller: tsandcompany Starting bid: $59

This would be absolutely adorable in a little girl's room, and the seller has another if you need it.
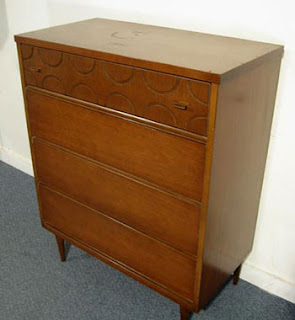

Dresser with circular pattern cut into top drawer
Seller: tsandcompany Starting bid: $50

This would make a great furniture rehab project. I would paint the top, sides and top drawer white, letting the wood show through the circular pattern.

Ebay finds

26 January 2009

Seller: lookingformod Buy it Now for: $250

After being inspired by all of the wonderful before & after projects on Design*Sponge, I have taken an interest in furniture rehabbing, redesign or whatever you want to call it. Basically taking an old piece of furniture and giving it new life with a coat of paint or new upholstery. Where can you find old pieces of furniture to rehab? I'm guessing flea markets, thrift stores, craigslist, estate sales but would you ever think to look on ebay?

I'm all about having unique pieces of furniture in your home and you can find some really great, affordable pieces to redo on ebay. The only drawbacks are that you can't inspect the piece before buying and you have to pay for freight shipping, which isn't cheap. Unless of course you are lucky enough to live near the person selling them. I have taken to browsing every so often to fantasize about how I would rehab certain pieces if I had more space, time and money. Check out lookingformod, artcollector-usa and tsandcompany. I have been watching the above table for weeks. Unfortunately there is no room for it in my apartment. Wouldn't it look great in an entryway or behind a sofa? Especially if someone painted it orange. Now that would be a bold statement. Just a thought.

Seller: tsandcompany Sold for: $33.51

I like the off-white color but I'm not a fan of gold. Would have to change the color of the knob or replace it completely.

Seller: tsandcompany Sold for: $102.50

Would definitely paint over the gold trim with orange or black lacquer spraypaint.